Pro Car Dealership WordPress Plugin
By Progression Studios
Thank you for purchasing this file. If you have any questions that are beyond the scope of this help file, visit our support forum.
Installation
Installing the player can be download by unzipping your original download. Then you can install the progression-car-dealer.zip file.
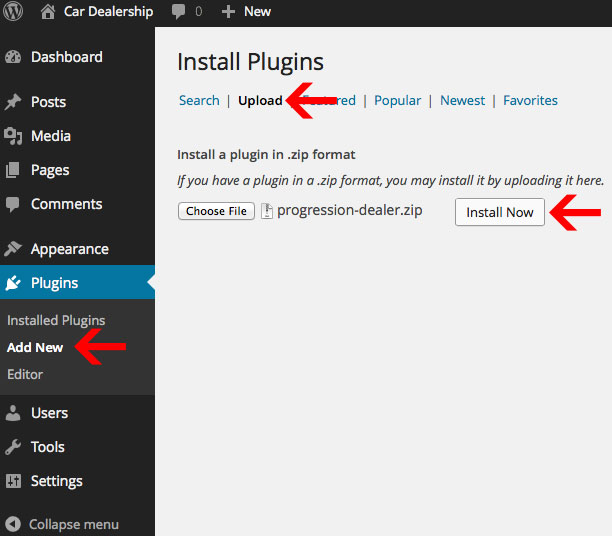
After you have clicked install, you can then Activate the plugin and it is now ready to be used!
Adding Vehicles
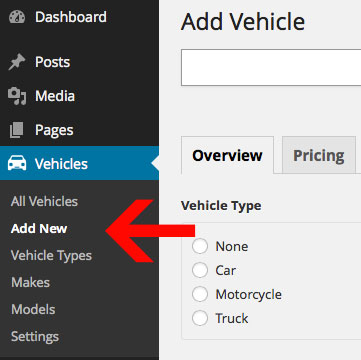
Once you have installed/activated the plugin, you will have a custom post type of "Vehicles". You can then "Add Vehices", edit vehicles, adjust vehicles models/makes/types, and the plugin settings.
To add a vehicle, just click "Add Vehicle" under the "Vehicles" post type. You can fill out as much or as little information as you would like.
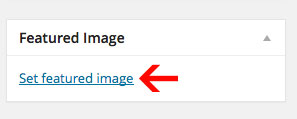
Adding a Featured Image
Adding a featured image is simple. Just click "Set Featured Image" in the right sidebar and upload the image. Then click "Set Featured Image" and select your image. The last step is to click "Use as featured image". See the example below.

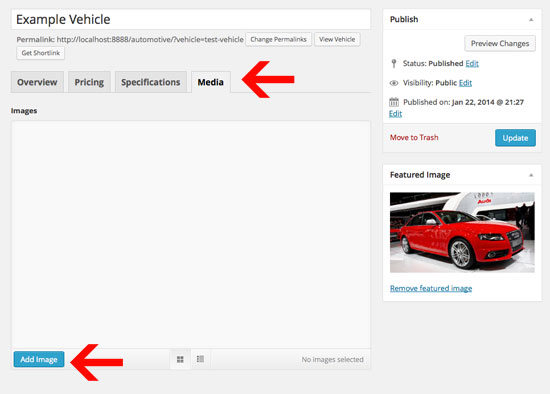
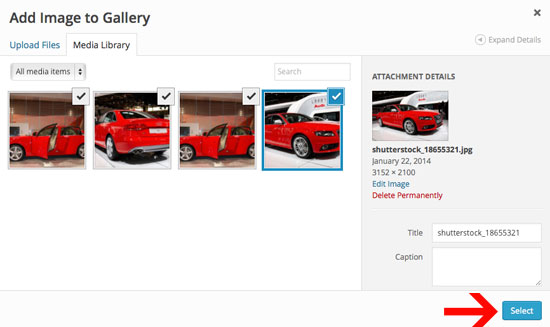
Adding Gallery
To add-in a gallery, just click on the "Media" tab. Then click "Add Image" and select the images you want in the gallery. After you have the item selected, click the "Select" button and you will have the images in your gallery. After the images have been added, you can drag/drop to re-order or remove any images from the gallery.
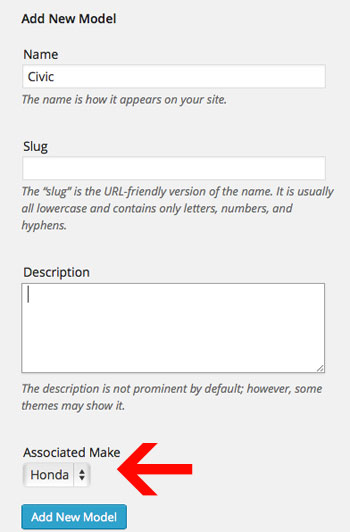
Adding Types, Makes & Models
You can control the Types, Makes & Models from the Vehicles Custom Post Type link. You can adjust these as needed.
The only thing to note is that the Models must refernece a Make. For example,f i you want to add a Honda Civic. You must first add the Honda Make. Then add a Civic Model and have the "Associated Make" be with Honda.
Vehicle Pages/Navigation
By default all of the vehicle pages are created automatically. You can just create a Make or Model and then add a vehicle to it. It will then build itself automatically as an archive.
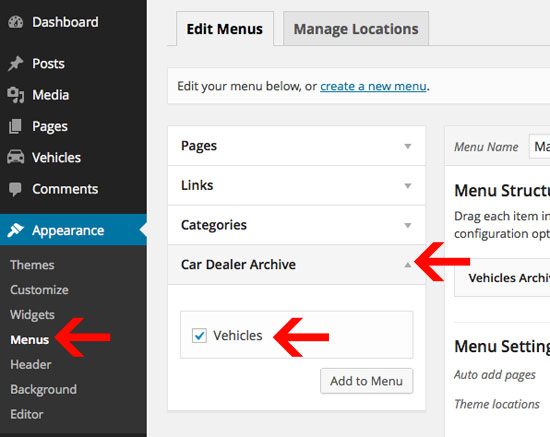
Adding Pages to Navigation Menu
Adding the vehicle pages to your navigation is simple. Just go under Appearance > Menu and then you can start adding vehicle pages.
By default the plugin will have a "Car Dealer Archive" section. Just click on that and then you can add a link to all "Vehicles" into your menu. Again, this will link to all vehilces.
Adding in more Vehicle Page Options
If you want additional navigation options like linking to Vehicle Types, Makes, and Models. Just click on 'Screen Options' in the top right while editing your Navigation menu. You can add Vehicle Types, Makes and Models to the list of options. Just select hte checkboxes and they will then appear as navigation options.

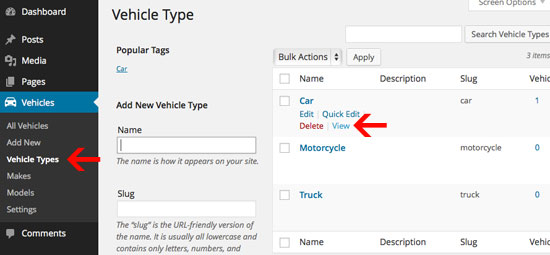
Visiting Archive Pages Manually
If you want to visit a page with a list of "Vehicle Types", "Makes" and "Models"... Just visit each section under the Custom Post type. From there you can see a list of each. Then hover over the item you want to visit, for example "Car" Vehicle Types. Click on the "View" link and it will allow you to view a list of all Car Vehicle Types. you can do this for Types, Makes, and Models.
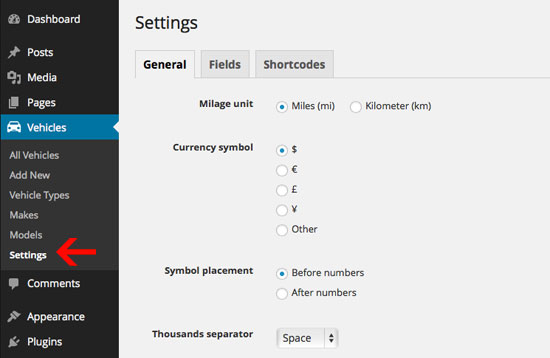
Plugin Settings
You can adjust the plugin settings under the "Vehicles" > "Settings". This allows you to adjust currency, separators, mileage and various other fields.
Each tabs allows you to control more of the plugin. You can even add new custom fields if you want. These will atomatically appear in the search bar.
Search
The search can be added using the shortcode below. This is most commonly added into a widget area. You can add this into a Text Widget and it will automatically be added to a sidebar. You can also add it to a template.
[vehicle_searchform]
By default this includes all search results.
Exclude Search Terms
[vehicle_searchform exclude="make,model"]
Include only a few Search Terms
[vehicle_searchform include="vehicle_type,make,model"]
Adjusting Search Order
You can adjust the search order by using the include shortcode. Just adjust the order of the elements via the shortcode.
[vehicle_searchform include="vehicle_type,make,model,registration,milage,condition,color,interior,transmission,engine,drivetrain,horsepower,fuel,keyword,order"]
Note: This list includes all of the default search terms
Add Vehicle Shortcode Into a Template
You can also include any shortcode into a template file. Ex. page.php or something like that. Here is the PHP shortcode:
<?php echo do_shortcode('[vehicle_searchform exclude="make,model"]'); ?>
Shortcodes
In addition to the search short-code, there are also many other shortcodes.
Vehicle Price Shortcode:
[vehicle_price]
Vehicle Specifications
[vehicle_specs]
Vehicle Gallery
[vehicle_gallery]
Vehicle Description
[vehicle_description]
Add Vehicle Shortcode Into a Template
You can also include any shortcode into a template file. Ex. page.php or something like that. Here is the PHP shortcode for vehicle price:
<?php echo do_shortcode('[vehicle_price]'); ?>
Customizing
You can easily customize this plugin. There are a number of ways to grab and manimulate the data.
Adjust Information added into post automatically
By default, the vehicle description, specifications, price, and gallery are added to the post content at the bottom.
[vehicle_description]
[vehicle_specs]
[vehicle_price]
[vehicle_gallery]
You can adjust this easily by adding this to your themes functions.php file:
	/**
	 * Change the vehicle content
	 * By default the_content() is overwritten by 4 shortcodes:
	 * [vehicle_description], [vehicle_specs], [vehicle_price] and [vehicle_gallery]
	 *
	 * Hook to the 'the_vehicle_content' filter to output your own markup.
	 * To manipulate of the output of the shortcodes see their filters (next example)
	 */
	add_filter( 'the_vehicle_content', 'my_vehicle_content' );
	function my_vehicle_content( ) {

		$content = '';

		/* 1. The Price */
		$content .= do_shortcode( '[vehicle_price]' );

		/* 2. The Specifications */
		$content .= do_shortcode( '[vehicle_specs]' );

		/* 3. The Description - remove the comment from the next line to display description */
		// $content .= do_shortcode( '[vehicle_description]' );

		/* 4. The Gallery - takes the same attibutes as the built-in Gallery
		 * http://codex.wordpress.org/Gallery_Shortcode
		*/
		$content .= do_shortcode( '[vehicle_gallery columns="4" link="file"]' );

		return $content;
	}
You can see an example of this and others in the car dealership plugin folder under /template/functions.php
Template Structure
You can customize the display of the archives and posts easily. You can so by creating these files (They will over-ride the default version of the file.):
- archive-vehicle.php (Controls the all vehices display)
- taxonomy-vehicle_type.php (Controls Makes, Models, and Type displays)
- single-vehicle.php (Controls the post page display)
The easiest way to start would be duplicating your themes existing files and then adjusting them. For example, duplicate your single.php file and rename it single-vehicle.php. Then any edits to the single-vehicle.php file will over-ride the default file. It will not effect any other areas of the theme, just the plugin templates.
Modifying Shortcodes
Check out examples in the plugin folder under /templates/functions.php file. For example if you wanted to edit the vehicle_specifications output. Use this in your themes functions.php file:
	/**
	 * Display the specs in a custom html table
	 */

	add_filter( 'pcd/get_specs', 'my_spec_table', 10, 3 );

	function my_spec_table( $html, $specs ) {

		ob_start(); ?>

		<ul id="pro-vehicle-specifications">
			<?php foreach ( $specs as $spec) : ?>
			<li>
				<span class="spec-label"><?php echo $spec['label'] ?>:</span>
				<span class="spec-value"><?php echo $spec['value'] ?></span>
			</li>
			<?php endforeach ?>
		</ul>

		<?php return ob_get_clean();
	}
Adding Meta-Data Manually
You can also manualy add-in data via get_post_meta. Here is WOrdPress documetnation on this: http://codex.wordpress.org/Custom_Fields
For example, you can see all of the meta values and their id's via this call. You would use this if you wanted to look-up some meta values that you cannot figure out:
<?php the_meta(); ?>
If you wanted to for instance, pull in the transmission field. You would use this call:
<?php echo get_post_meta($post->ID, 'transmission', true) ?>
Translating
You can easily translate this plugin via:
http://wordpress.org/plugins/codestyling-localization/Install and activate the plugin and go to Tools > Localization (shown in your language), then follow the instructions on how to translate the plugin.
Sources and Credits
I've used the following images, icons or other files as listed.
Once again, thank you so much for purchasing this theme. As I said at the beginning, I'd be glad to help you if you have any questions relating to this theme. No guarantees, but I'll do my best to assist. Feel free to rate my template as 5 out of 5 stars. If it's not a 5 of out 5, e-mail me and let me know what I can do to improve your experience.
Michael Garcia, mike@progressionstudios.com
Need help? Check out our Support Forum